Local Test Environment
Categories:
7 minute read
INFO
This is written using Ubuntu 20.04 running in WSLInstall an WSL instance
Ansible relies on SSH and other tools native to Linux operating systems. Probably the most seamless way of installing Ansible onto a Windows workstation (Windows 10/11) is to use the Windows Subsystem for Linux (WSL). Once configured, you will have a Linux instance running in as seamless a way as possible running a Linux distro of your choice that you can interact with from Windows.
Setup a shared working directory
Create a working directory to store all the files. This should be somewhere that is accessible from both Windows and Linux. An easy approach is to create a new root folder in the Windows home directory called devops which you can then divide up into project folders by creating sub-folders. You can also create a symbolic link to this folder from Linux so it’s easier to access.
Create the
devopsfolder in your Windows user home directory, then create a sub-folder calledtest
On the Ubuntu terminal, create a symbolic link to the
devopsdirectory. You can then CD directly into it.
ln -s /mnt/c/users/winuser/devops

cd devops/test/
Install Ansible
Open the WSL Ubuntu terminal and make sure your WSL distro is up to date.
sudo apt update && sudo apt upgrade -y
Add the Ansible repository to APT then install it
sudo apt install software-properties-common
sudo add-apt-repository --yes --update ppa:ansible/ansible
sudo apt install ansible
Check the Ansible system is installed
ansible --version
Check it works from Windows
Now you have WSL running a Linux instance upon which you have installed Ansible. If you open a Terminal session on Windows and run the following it should execute the Ansible binary.
PS ~> wsl ansible --version
ansible [core 2.14.5]
  config file = /etc/ansible/ansible.cfg
  configured module search path = ['/home/neil/.ansible/plugins/modules', '/usr/share/ansible/plugins/modules']
  ansible python module location = /usr/lib/python3/dist-packages/ansible
  ansible collection location = /home/neil/.ansible/collections:/usr/share/ansible/collections
  executable location = /usr/bin/ansible
  python version = 3.10.6 (main, Mar 10 2023, 10:55:28) [GCC 11.3.0] (/usr/bin/python3)
  jinja version = 3.0.3
  libyaml = True
Test Ansible
INFO
This requires that you have a target test server running Linux that you can connect to on IP
It should be accessible using SSH keys
This process will create a basic test to validate things are working.
In the test folder create a new sub-folder called test-ansible. Create an Ansible inventory file that will define the target Linux server(s) you will test against. Create a text file called inventory.ini and structure the contents as per the example below.
[example]is the group name
192.168.0.10is the IP of a target, this can also be a DNS value
[example]
192.168.0.10
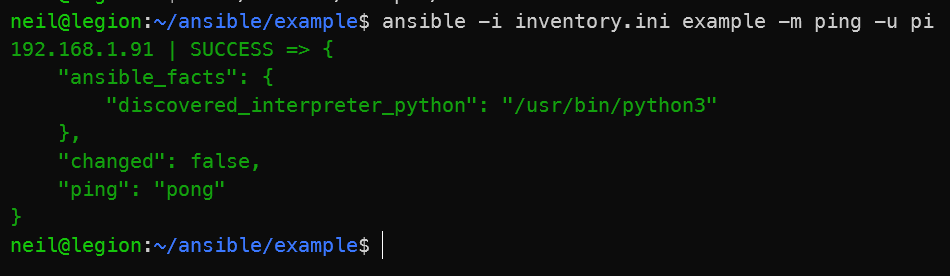
This command will run the ping module on all hosts defined in the inventory.ini file using the specified username for authentication. The ping module will test the connection to each host in the inventory and return a “pong” message if successful.
ansible -i inventory.ini example -m ping -u [username]
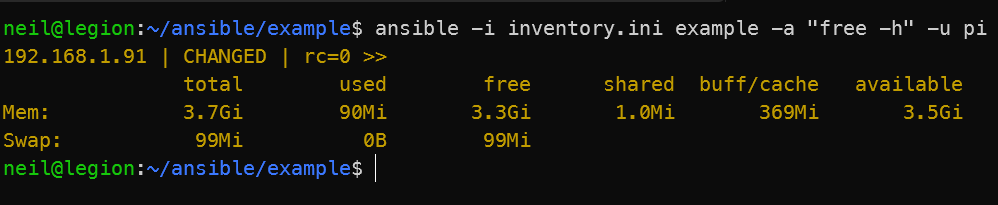
This command will run the free -h command on all hosts within the specified group in the inventory.ini file using the specified username for authentication. The free -h command displays the total, used, and free memory in a human-readable format.
ansible -i inventory.ini example -a "free -h" -u [username]
Install Vagrant
Vagrant is an open-source tool that simplifies the process of configuring, managing, and provisioning virtual development environments, primarily using VirtualBox, VMware, and other virtualization platforms, to enable consistent and reproducible development workflows.
Install VirtualBox
VirtualBox is a free, open-source, cross-platform virtualization software that allows users to create, manage, and run multiple virtual machines with different operating systems on a single physical host machine.
You only need to install VirtualBox on Windows; not the WSL.
Find the downloader for your Windows operating system and install it.
Test Vagrant & Virtual Box
This process will create a basic test to validate things are working.
In
devops/testcreate a new sublfolder calledtest-vagrantand CD into it.
In the
test-vagrantfolder create a Vagrant box by running the following command. This will download the Vagrant Box image to the project folder.
vagrant box add geerlingguy/rockylinux8
Now initialize a new Vagrant project with the base box “geerlingguy/rockylinux8” as the starting point. You will have a new file called
Vagrantfilein the folder which we’ll execute on the next step.
vagrant init geerlingguy/rockylinux8
This will run the
Vagrantfilefile against the downloaded box image and start the VM in VirtualBox. It willl be a bit error prone and the SSH won’t work without some configuration which will skip as below we can do it better.
vagrant up
To check it worked “enough, run this command and you should have a new instance
running.
vagrant status
Now let’s clean-up the instance by running the following command which deletes it.
vagrant destroy
Test Vagrant & Ansible
In the /devops/test folder created a new folder called test-vagrant-and-ansible.
Instead of creating the vagrant box step by step, we’ll take advantage of using a declarative file.This file is customized to take advatnage of your SSH public and private keys. During the init process your public key is placed onto the VM. So when the VM has booted you can logon directly using your private key. This is much closer to how teams actually use this kind of technology as the files can be stored centrally in a VCS and shared easily. It also clears up those SSH errors you got when testing Vagrant.
Create a file called Vagrantfile in the test-vagrant-and-ansible folder and paste the content below.
Vagrant.configure("2") do |config|

  config.vm.box = "geerlingguy/rockylinux8"
  config.vm.box_check_update = true # Check for box image updates
  config.vm.define "test-vagrant-and-ansible" # Set the box name

  # Disable Vagrant's automatic SSH key generation
  # So you can use your own
  config.ssh.insert_key = false

  # Only the specified SSH keys for authentication and
  # disable password authentication entirely.
  config.ssh.keys_only = false

  # Used to specify the location of the private SSH key
  # The insecure key is required so the VM does not time out during creation
  config.ssh.private_key_path = ["~/.ssh/id_rsa", "~/.vagrant.d/insecure_private_key"]

  # Used to define provisioning instructions for the virtual machine
  # after it has booted
  #
  # The file provisioner is used to transfer a file from the host machine to the guest VM
  config.vm.provision "file", source: "~/.ssh/id_rsa.pub", destination: "~/.ssh/authorized_keys"

  # Configure public network for VMs to use DHCP service
  config.vm.network "public_network", bridge: "Intel(R) Wi-Fi 6 AX200 160MHz"

  # Collect the IP address of the VM and store it in a file on the host machine
  config.vm.provision "shell",
    inline: "ifconfig | grep 'inet addr:' | cut -d: -f2 | awk '{ print $1}' >> /vm_ips.txt"
end
Now run
vagrant upwhich will execute the file.
Once finished, you can run
vagrant sshand you should be logged onto the new VM without a password.
In the same working directory test-vagrant-and-ansible create a new file called playbook.yaml. This is the file that has the Ansible playbook data. Paste the basic playbook data below into the new file.
---
- hosts: all
  become: yes

  tasks:
  - name: Ensure Chrony (for time sync) is installed
    yum:
      name: chrony
      state: present

  - name: Ensure chrony is running
    service:
      name: chronyd
      state: started
      enabled: yes
Now we need to tell Vagrant to call the playbook.
Edit the
Vagrantfileand append the following data to the end of the file before the lastend.
  #Provisioning configuration for Ansible
  config.vm.provision "ansible" do |ansible|
    ansible.playbook = "playbook.yml"
  end
Now run
vagrant provisionto run the new code which will execute the Ansibe playbook file.
The Ansible playbook should now run and ensure Chrony is installed and running on the instance created by the Vagrantfile. Notice that we do not call an inventory file to target the Vagrant instance, this is because the playbook is referred to directly in the Vagrantfile so it uses that as the target.
A successful test looks like this
$ vagrant provision
==> test-vagrant-and-ansible: Running provisioner: file...
    test-vagrant-and-ansible: ~/.ssh/id_rsa.pub => ~/.ssh/authorized_keys
==> test-vagrant-and-ansible: Running provisioner: shell...
    test-vagrant-and-ansible: Running: inline script
==> test-vagrant-and-ansible: Running provisioner: ansible...
    test-vagrant-and-ansible: Running ansible-playbook...

PLAY [all] *********************************************************************

TASK [Gathering Facts] *********************************************************
ok: [test-vagrant-and-ansible]

TASK [Ensure Chrony (for time sync) is installed] ******************************
ok: [test-vagrant-and-ansible]

TASK [Ensure chrony is running] ************************************************
ok: [test-vagrant-and-ansible]

PLAY RECAP *********************************************************************
test-vagrant-and-ansible   : ok=3    changed=0    unreachable=0    failed=0    skipped=0    rescued=0    ignored=0
References
Feedback
Was this page helpful?
Glad to hear it!
Sorry to hear that.