Azure Point-to-Site VPN
Categories:
6 minute read
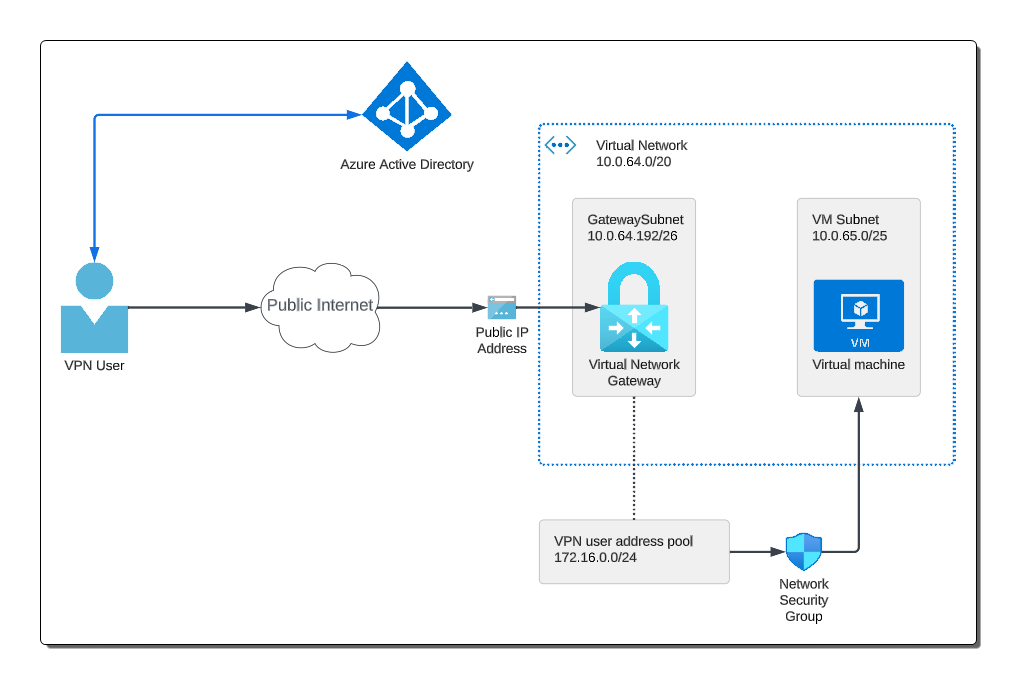
Point-to-Site (P2S) VPN in Azure is a method that allows an individual device to connect to resources within an Azure virtual network, typically without the need for a dedicated VPN device. This is useful for remote workers, individual developers, or scenarios that involve infrequent access from specific devices.
WARNING
This lab creates a chargeable resource. The SKU type documented here (VpnGw1) costs $0.19 for each hour that it is provisioned and available plus additional costs based on data transfer.
Requirements
- VNET to host the VPN Gateway.
- VNET Subnet configured to support a VPN Gateway.
- VPN Gateway configured to support a point-to-site VPN in your target VNET.
- Azure Active Directory tenant configured for Azure VPN
VNET
When setting up a Point-to-Site (P2S) VPN, establishing a VNet is a fundamental step, as it will host the VPN gateway and the resources that remote clients will access. The choice of the Azure region for the VNet should take into account the geographical location of users and other logistical factors to optimize performance and reduce latency. The IP address space of the VNet needs careful consideration. This address range should align with your overall network planning and avoid overlaps with other networks, especially if there’s an intention to link with on-premises networks in the future.
VPN Gateway Subnet
When preparing for a Point-to-Site (P2S) VPN, it’s crucial to establish a dedicated subnet for the VPN gateway. This subnet provides a specific range of IP addresses from within the VNet’s address space where the VPN gateway will reside.
Once you’ve created the GatewaySubnet, the Virtual Network Gateway gets provisioned into it. It’s the infrastructure in Azure that facilitates the VPN connections from external clients.
Choosing the right address range for this subnet is essential. It needs to accommodate the VPN gateway but also be consistent with the broader address space configuration of the VNet. Allocating this dedicated subnet for the VPN gateway ensures that there’s a clear demarcation, making it easier to manage, monitor, and troubleshoot VPN connections in the future.
The VPN gateway uses a specific subnet called GatewaySubnet which is part of the VNet IP address space you specify. It contains the IP addresses that the VPN gateway resources and services use. Choose a big enough subnet to host all the services; a minimum of a /27 is recommended.
VPN user address pool
The connected users (VPN clients) do not get an IP address from the GatewaySubnet. Instead, when you’re setting up the Point-to-Site configuration on the Virtual Network Gateway, you define an address pool that the connected VPN clients will use. This address pool provides the IP addresses that are assigned to the VPN clients when they connect.
The address pool for the VPN clients should be a range of IP addresses that is separate and distinct from any subnet within the VNet, including the GatewaySubnet. This ensures there’s no IP address overlap or conflicts between Azure resources and connected VPN clients.
Virtual Network Gateway
The Virtual Network Gateway acts as the anchor point in Azure for your Point-to-Site (P2S) VPN. Essentially, it’s the gateway through which remote clients will connect to access resources within your Azure VNet. When setting this up, it’s paramount to select the VPN gateway type, distinguishing it from the other types of gateways like ExpressRoute.
The configuration process requires specifying certain parameters. First, you’ll need to decide on the SKU or performance tier of the gateway, balancing between performance requirements and cost. Then, you’ll associate the previously created subnet explicitly designated for this VPN gateway.
Additionally, during configuration, it’s essential to consider the type of VPN, the IP configurations, and the public IP address that will be associated with the gateway. Properly configuring the Virtual Network Gateway ensures secure and efficient connections between remote clients and the Azure VNet.
Steps
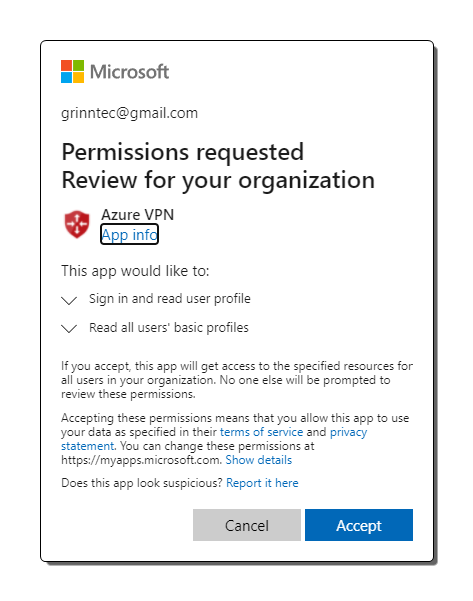
Authorize the VPN in Azure Active Directory
Grant admin consent for your organization. This allows the Azure VPN application to sign in and read user profiles.
- Sign into the Azure portal using the global admin account
- Locate the
Tenant IDof the Azure AD tenant - Copy the URL into a browser window replacing the text
ttttttttttafterhttps://login.microsoftonline.com/with the tenant ID from step 2
https://login.microsoftonline.com/tttttttttt/oauth2/authorize?client_id=41b23e61-6c1e-4545-b367-cd054e0ed4b4&response_type=code&redirect_uri=https://portal.azure.com&nonce=1234&prompt=admin_consent
- When prompted to logon use the global admin account
- When prompted accept adding Azure VPN
- In Azure AD under
Enterprise Applicationscheck that Azure VPN is listed
Create the VPN Gateway Appliance
INFO
The creation can take up to 45 minutes to complete- In the Azure portal, search for
virtual network gatewayin the marketplace. - Set the parameter values according to your specific needs. For this example I am keeping it as basic as possible so for example, will not be use a zone redundant appliance, which if this were to be production you should be considering for resiliency.
- Add any tags as needed and click create. This can take a while, normally 45 minutes.
| Parameter | Value |
|---|---|
| Subscription | sandbox |
| Name | vgw-sandbox-westeurope |
| Region | West Europe |
| Gateway type | VPN |
| VPN type | Route-based |
| SKU | VpnGw1 |
| Generation | Generation 1 |
| Virtual Network | vnet-sandbox-westeurope |
| Subnet | GatewaySubnet (automatically selected) |
| Public IP Address | pip-vgw-sandbox-westeurope |
| Enable active-active mode | Disabled |
| Configure BGP | Disabled |
Configure the VPN gateway for Azure AD authentication
- In the VPN gateway resources go to the
point-to-site configuration - Select
configure nowand configure the user address pool your VPN users will receive an host IP address from. - For
Tunnel TypeselectOpenVPN (SSL). - For
Authentication typeselectAzure Active Directoryand complete the following sections:
Tenant: TenantID for the Azure AD tenant. Make sure the Tenant URL does not have a \ at the end.
https://login.microsoftonline.com/{AzureAD TenantID}
Audience: The Application ID of the “Azure VPN” Azure AD Enterprise App.
41b23e61-6c1e-4545-b367-cd054e0ed4b4
Issuer: URL of the Secure Token Service. Include a trailing slash at the end of the Issuer value. Otherwise, the connection may fail.
https://sts.windows.net/{AzureAD TenantID}/
Download the VPN client configuration XML file
You can download an XML configuration files that you can use to configure the Azure VPN Client profile on client computers.
- At the top of the Point-to-site configuration page, click Download VPN client. It takes a few minutes for the client configuration package to generate.
- Extract the downloaded zip file.
- Browse to the unzipped “AzureVPN” folder.
The azurevpnconfig.xml contains the setting for the VPN connection. You can also distribute this file to all the users that need to connect via e-mail or other means. The user will need valid Azure AD credentials to connect successfully.
Configure and connect a user device
You can download and install the Azure VPN Client from the Microsoft site or use the Microsoft Store in the Windows OS.
When installed, open the client and choose the import feature. Locate the azurevpnconfig.xml file which holds all the configuration for the VPN connection, save the imported profile.
When you connect you will be prompted to authenticate with an Azure Active Directory user profile.
References
https://docs.microsoft.com/en-us/azure/vpn-gateway/openvpn-azure-ad-tenant