Authenticate to Azure from GitHub Actions
Categories:
10 minute read
This page will document two methods to access Azure from a GitHub repository when running GitHub Actions. The two methods are OpenID Connect (OIDC) and service principal name (SPN). Both are valid methods and widely used but its important to note that the preference is to use OIDC in-place of SPN as OIDC provides better security properties such as dynamic, short-lived tokens, and system-bound authentication, reducing the overall risk and administrative overhead.
OIDC:
OIDC doesn’t require hardcoded secrets in the GitHub repository. Instead, it uses dynamically generated tokens with a short lifespan (typically one hour). This reduces the risk of long-term credential compromise and is generally considered a more secure practice.
Tokens are also tied to specific systems (in this case, GitHub Actions). This means that even if a token is somehow leaked, it can’t be used from another system, significantly limiting potential misuse.
SPN:
Requires hardcoded credentials, such as a username/password or a client id/secret. This could expose your systems to vulnerabilities if not properly secured. Managing these secrets can also present administrative challenges, especially in larger environments.
The credentials of an SPN can be used from any system, not just GitHub Actions. While this provides some flexibility, it also increases the attack surface because anyone with the credentials can authenticate and misuse them.
OIDC
OpenID Connect (OIDC) allows your GitHub Actions workflows to access resources in Azure, without needing to store the credentials as long-lived GitHub secrets.
To use GitHub actions with an Azure environment you require the following:
- Create an app registration in Azure AD that represents your external service or application, in this case GitHub.
- Create a service principal associated with the app registration
- Assign the service principal permissions to Azure using RBAC
- Create a federated identity credential configured to trust tokens issued by GitHub
- Create GitHub repository secrets targeting your Azure environment
- Test connectivity with a GitHub Actions workflow
(1) Register an Azure AD application
The first step is to create a new application registration in Azure AD. This application represents GitHub Actions in the Azure AD ecosystem. During registration, Azure generates a client ID (also known as the application ID) and a client secret (like a password), which GitHub Actions will later use to authenticate itself to Azure AD.
Login to Azure
As Azure AD is global for the tenant there is no need to specify which subscription you are working in.
az login
Create the Azure AD application
Replace
{Name}with something that describes the use case, for examplegithub-actions. This will create a new object in the App Registrations section of Azure AD. It will also produce a JSON document on the CLI. For the next step, you need to retrieve the value ofappIdfrom the JSON file or alternatively theApplication (client) IDvalue from Azure AD in the portal.
az ad app create --display-name {Name}
(2) Create a Service Principal
The app registration just created declares GitHub as an application in the Azure AD tenant but you cannot use it directly, for that you need to create a service principal. This is an object that is associated with the app registration and holds the permissions the app has through RBAC. In this example, we create the service principal then assign it the contributor role to an Azure subscription. This in effect means we are granting the app registration for GitHub Actions the same permissions as the two are linked at the creation stage of the service principal as we use the app registration appId to create the service principal.
Create a service principle using the value taken from the previous step in-place of the
{appId}value.From the outputted JSON document for this command, you need to use the
idvalue in the next command.
az ad sp create --id {appId}
(3) Assign RBAC permissions
Now we assign the new service principal the
contributorRBAC role to a subscription.Replace the
{subscriptionId}value with your own actual subscription ID.Replace the
{spnId}value with theidvalue taken from the previous command when you create the service principal.
az role assignment create --role contributor
                          --subscription {subscriptionId}
                          --assignee-object-id  {spnId}
                          --assignee-principal-type ServicePrincipal
                          --scope /subscriptions/{subscriptionId}
(4) Create a federated identity credential
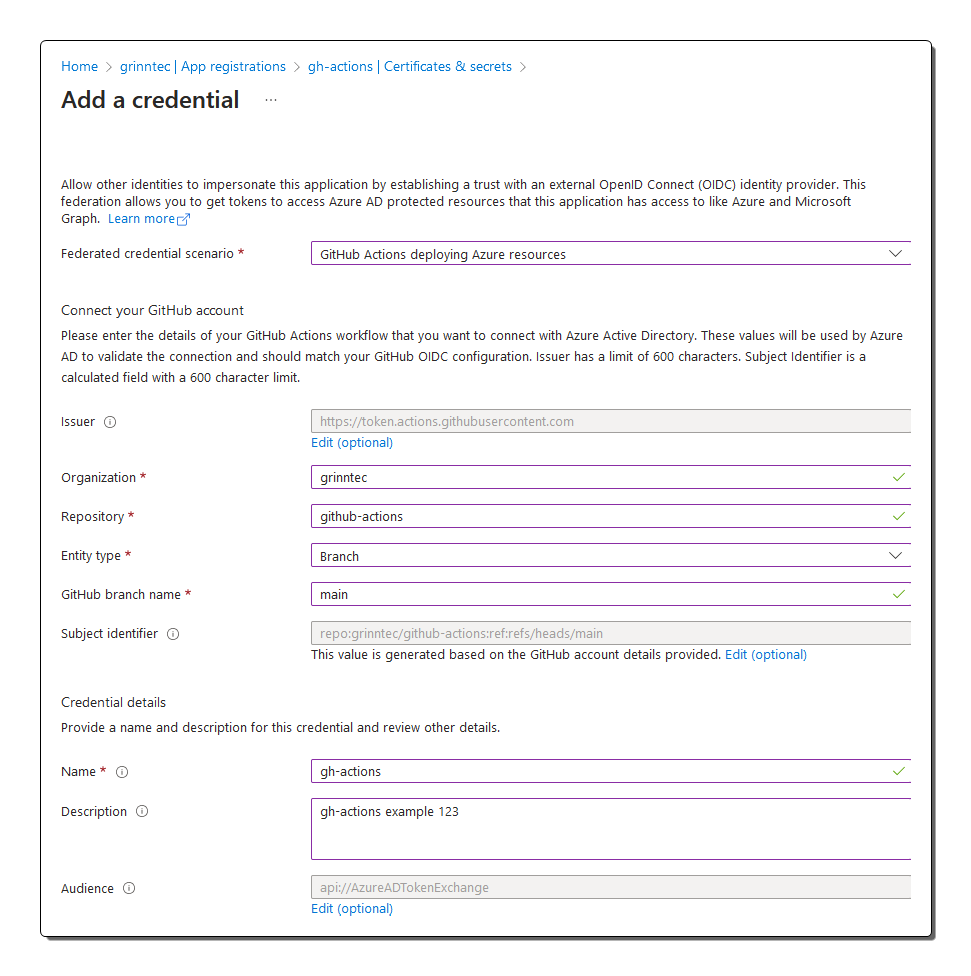
This will create a trust relationship object in Azure that can be used between the created app registration and an external IdP, which in this case is GitHub. This is integral in the process when GitHub Actions asks Azure AD for an access token as it presents its external token. The values in that external token must be configured here for the trust relationship to be checked and verified. The same is true on the GitHub Actions workflow side, which is covered later on.
When GitHub Actions sends its external token to Azure AD asking for an access token its external token must contain the exact same values of the issuerand subject as what is configured in the the Azure AD federated credential. This is critical to passing the validation check.
These are the values of the configuration in the credential.json file.
nameis the unique identifier of the federated credential, you can use the display name from step 1
issueris the URL of the external IdP. The value for this example using GitHub Actions is set ashttps://token.actions.githubusercontent.comwhich will be the same for you as this is universal.
subjectis the identifier of the external workload, which is specific to the workload and needs to be accurate. The subject part of the configuration is harder to set as it is quite dynamic based on how your GitHub is configured, see the referenced link below for the official GitHub documentation. For this example I’m keeping it simple by just referencing the defaultmainbranch of the GitHub repository.
descriptionis basic text used to help identity the federate credential
audiencesis which Microsoft identity platform must accept in the incoming token
Subject example
Syntax:
repo:<orgName>/<repoName>:ref:refs/heads/<branchName>My example:
repo:grinntec/github-actions:ref:refs/heads/main
To run this on the AZ CLI, first create a credential.json file in your current working directory and add the following JSON data editing the values as described above.
{
    "name": "{name}",
    "issuer": "https://token.actions.githubusercontent.com",
    "subject": "{subject}",
    "description": "{description}",
    "audiences": [
        "api://AzureADTokenExchange"
    ]
}
Then run this command referencing the credential.json file for the parameters.
appIdis the ID of the app registration created in step 1
az ad app federated-credential create --id {appId} --parameters credential.json
Alternatively, you can use the Azure portal as shown here.
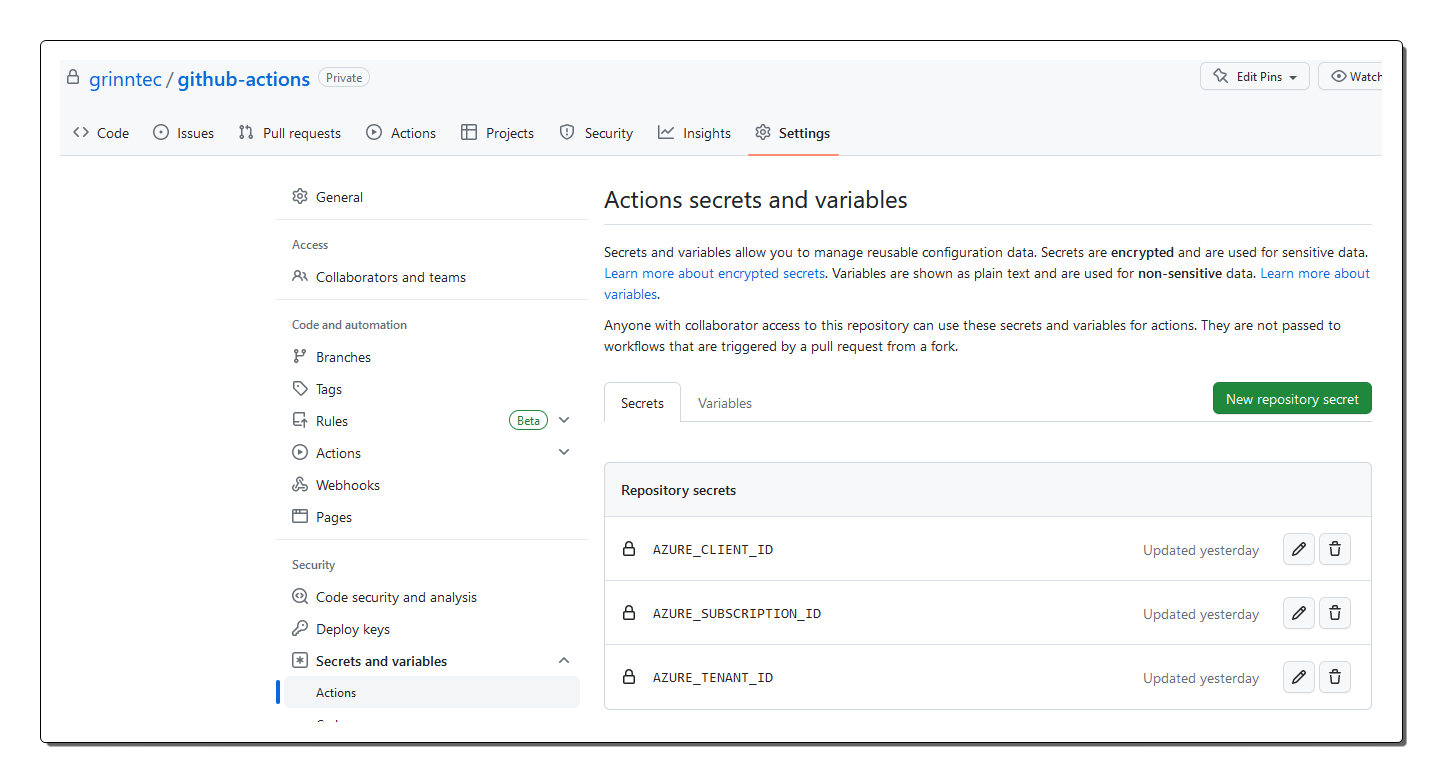
(5) Create GitHub secrets with Azure target values
In the GitHub repository you can add the target Azure environment values as hardcoded secrets (in effect secure environment variables) which can be referenced by the GitHub Actions workflow. These values are passed to the arguments used by the azure/login@v1 GitHub action job. It is optional to hardcode them as secrets, you can just pass them directly in the workflow if preferred which might be that case for instance if your ODIC profile has access to all the subscriptions. You can choose to code the subscription ID in the workflow based on the target.
The following values are required:
AZURE_CLIENT_IDis theappIdfrom step 1
AZURE_TENANT_IDis the tenant ID for your Azure tenant
AZURE_SUBSCRIPTION_IDis the subscription ID of the target Azure account
You can use the GitHub portal as shown here.
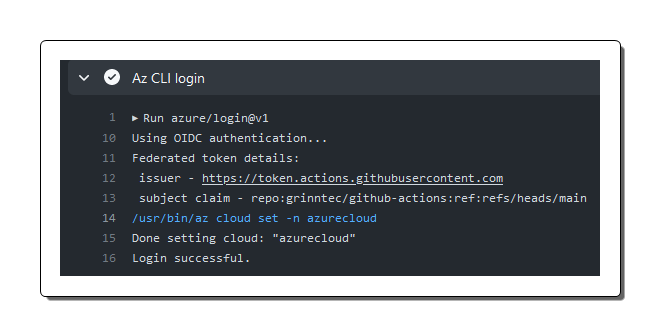
(6) Confirm connectivity
This GitHub Action can then be used to test that the GitHub repository can authenticate to Azure using OIDC. Notice that it uses the GitHub repository secrets for example ${{ secrets.AZURE_CLIENT_ID }}. To create the test workflow create the following folder path {repository_root}/.github/workflows then create a file named test-azure-authentication.yaml. Paste the contents from this code block into the new file and save it. Make sure Actions is enabled on your repository, then from the Action tab run the workflow manually.
This workflow only executes manually using the
[workflow_dispatch]trigger method
name: Azure Login with OIDC
on: [workflow_dispatch]

permissions:
      id-token: write
      contents: read

jobs:
  login:
    runs-on: ubuntu-latest
    steps:
    - name: 'Az CLI login'
      uses: azure/login@v1
      with:
          client-id: ${{ secrets.AZURE_CLIENT_ID }}
          tenant-id: ${{ secrets.AZURE_TENANT_ID }}
          subscription-id: ${{ secrets.AZURE_SUBSCRIPTION_ID }}
In the GitHub Actions portal, after the action has executed, you can clearly see the result of the job titled Az CLI login has processed and that login was successful. You can also see the claim value in the token which mirrors the subject configuration described above repo:grinntec/github-actions:ref:refs/heads/main.
References
Configure an app to trust an external identity provider
SPN
A service account needs to exist that has contributor rights to wherever in Azure you want to work with resources. This could be the root tenant, a management group, a subscription, or even a resource group. As the permissions will delegate downwards, the higher up the tree the more widespread your SPN will have access so be aware where this account has rights.
You can refer to this document for full details Terraform authentication
Create the SPN and assign RBAC permissions
You can create a new SPN and assign it permissions to your target resource area using the AZ CLI command below.
Replace
spNamewith the desired display name of the accountReplace
subscriptionIdwith the ID of the subscription where thecontributorrole will be assigned. Remember you can go higher to a management group or lower to a resource group by changing thisscopetarget value.
az ad sp create-for-rbac --name "spName" --role contributor
                                --scopes /subscriptions/{subscriptionId}
                                --sdk-auth
When you run this command it will output some values that you must document. The password is non-retrievable and if you lose it you need to re-create the SPN again. You can add the appId and password to a secret in an Azure key vault for safe keeping.
This is dummy data and does actually not exist so you cannot use it :-)
{
  "appId": "7bd35g34-sws6-346gh-b534-ferw351535677",
  "displayName": "gh-actions-example",
  "password": "Sdw345D~fE8D8djdfjsfsfjSJ828rfS~fsdfsS9",
  "tenant": "17452008-ed27-47bc-b363-3fsfsksSJf9fss"
  ...
  ...
}
appIdis the SPN user
displayNameis the human readable name of the SPN
passwordis the password of the SPN
tenantis the Azure AD tenant where the SPN exists
Setup GitHub to use the SPN
The SPN now exists and has contributor permissions in your Azure tenant. Now you need to configure GitHub so it can use the SPN when it creates resources. The worst method is to put any kind of credential in your code or leave it as plain text. Never do this. The method GitHub uses is to refer to secured environment variables that are configure a the GitHub repository level. When the GitHub action is executed GitHub looks for the environment variables and uses them in that session to authenticate to your tenant.
In the GitHub portal browse to the repository that hosts your Terraform code and that will run your GitHub action. Go to the settings menu and locate ‘Secrets’ then click the ‘Actions’ option. This will open a screen that allows you to enter new repository secrets. Once the secret is set you cannot retrieve it, the only option is to update or remove it. The name of the secret is important as this is what Terraform will be looking for, this includes case. Do not include the "" marks.
For a standard GitHub action you can create a new Secret value named AZURE_CREDENTIALS and paste the JSON output from the creation stage as the value. This will then be referenced in the following GitHub Action.
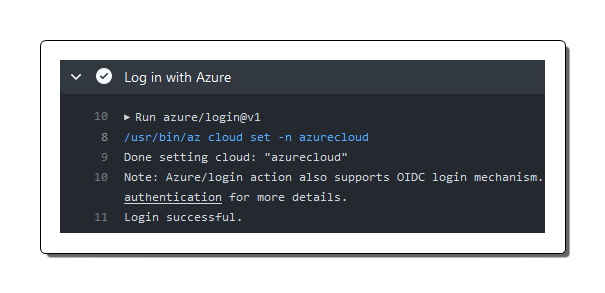
Confirm connectivity
This GitHub Action can then be used to test that the GitHub repository can authenticate to Azure using the SPN. Notice that it uses the GitHub repository secrete ${{ secrets.AZURE_CREDENTIALS }}.
name: Azure Login with SPN
on: [workflow_dispatch]

jobs:
  login:
    runs-on: ubuntu-latest
    steps:
      - name: Log in with Azure
        uses: azure/login@v1
        with:
          creds: '${{ secrets.AZURE_CREDENTIALS }}'
For Terraform
Create the following secrets and use the values output from the SPN creation earlier as the values.
ARM_CLIENT_IDis theappId
ARM_CLIENT_SECRETis thepassword
ARM_SUBSCRIPTION_IDis the ID of the Azure subscription
ARM_TENANT_IDis thetenant

References
Use the Azure login action with a service principal secret
Feedback
Was this page helpful?
Glad to hear it!
Sorry to hear that.