Create a Docker Image, test, update and version control it, then publish it to Docker hub
Categories:
11 minute read
Requirements
- A Linux or Windows workstation where you can work with Docker daemon - Docker Getting Started
- A free or paid Docker Hub account - Docker Hub
- Some web code to run, a simpe ‘Hello World’ upwards is good, see link below
Working directory
On your workstation, ensure you have Docker installed, and it’s up to date; this was written using v20.10.23. Set up a working directory to create files and work with Docker data. I use GitHub for these projects as I can save them for later.
My working directory is called lab-web, and it’s a folder from my GitHub repository checked out to my workstation.
Web code
Before creating the Docker image, you need to organize your web code into your working directory. In lab-web create a new sub-directory called src. Put your web code into the src directory.
This src directory will be referenced later in the Docker image as the source for a copy/paste operation that puts the contents into the web server, which will then be published. If you were to run this image with future updates, you’d update the contents of the src folder with your revised web code and build a new Docker Image with a new version tagged.
The filesystem will look like this
.lab-web
  |__src
  |  |__images
  |     |docker.svg
  |  |index.html
  |  |script.js
  |  |style.css
  |Dockerfile
Create the Docker file
In the root of the working directory, create a new file named Dockerfile. It’s essential to capitalize the D and not add an extension.
This file is the instructions Docker will use to create the image. You can copy/paste in the example below. You can make your variation of the file, but if you copy/paste what is below, you’ll create a web server running NGINX with the contents of the src folder as the website and accessible on HTTP. There are many more options to configure if there were to be a production environment, but as a hands-on lab to get the grips with the fundamental concepts of Docker, it’s perfectly viable. You are responsible for your environment, so use it at your own risk.
Example Dockerfile
# Use an official Nginx image as a parent image
FROM nginx:latest

# A LABEL is a key-value pair it defines the maintainer of the image
LABEL maintainer="someone@emaildomain"

# Set the working directory in the container to /usr/share/nginx/html
WORKDIR /usr/share/nginx/html

# Copy the specified directory contents into the container at /usr/share/nginx/html
COPY ./src .

# Make port 80 available to the world outside this container
EXPOSE 80

# Run Nginx when the container launches
CMD ["nginx", "-g", "daemon off;"]
FROM nginx:latest: indicates the base image. In this case, it’s using the latest version of the official Nginx image from Docker Hub.
LABEL maintainer="{someone@emaildomain}": The LABEL instruction adds metadata to an image. A LABEL is a key-value pair. Here, it defines the maintainer of the image, which is an email address in this case.
WORKDIR /usr/share/nginx/html: sets the working directory for any instructions that follow in the Dockerfile. It’s the directory where Nginx expects to find the files to serve on the web.
COPY ./src .: copies files or directories from ./src and adds them to the filesystem of the image at the path .. Here, it’s copying everything from the src directory (relative to the Dockerfile on your host machine) to the current directory in the Docker image (which is /usr/share/nginx/html due to the WORKDIR command).
EXPOSE 80: informs Docker that the container listens on the specified network port at runtime. Here, it’s port 80 and we’ll use 8080 as the listener on the Docker host network interface (port mapping 8080 to 80).
CMD ["nginx", "-g", "daemon off;"]: The CMD instruction provides defaults for an executing container. Here, it’s starting the Nginx server. The -g option sets global directives, and daemon off; means run Nginx in the foreground, which is necessary for Docker.
Create the Docker image
Now we have two key data points set, the website code in the src directory and a Dockerfile configured with the parts to host the website on Nginx; we can create the Docker image.
The following command will create a Docker image based on what is defined in the
Dockerfilefile. In effect, it will create a temporary container, execute the commands, and save the files to a template file we call the Docker image. The-tparameter allows us to tag the image in this example aslatest. The trailing period is essential as it tells Docker to use the current directory, so run this command in the root of the working directorylab-web.
docker build -t lab-web:latest .
The command will execute, show some messages, then complete. But where is the Docker image? It’s not in the working directory. The Docker process locates the image file in the local Docker registry. If you run the following command, listing all the Docker images on your local system, you will see a new one called:
$ docker image ls
REPOSITORY             TAG       IMAGE ID       CREATED              SIZE
lab-web                latest    c1f84404810b   About a minute ago   142MB
Test the image
Now we’ll run a rudimentary test by simply opening the website and checking it manually. In a more complex environment you will automate testing and have unit tests and Cyrpress tests and other such tools to do this at scale, but for now this is fine.
This command will now run the image as a container. The
-dtells Docker to run the container as a daemon so you get your shell back; otherwise, the shell will be locked while the container runs. The-pdefines the port mapping so we can access a port on the Docker host and access the container port, which in this example is 8080 mapping to 80 (remember in the Dockerfile we told Nginx to listen on 80). Lastly, we run the Docker image and tag combination we created earlier.
docker run -d -p 8080:80 lab-web:latest
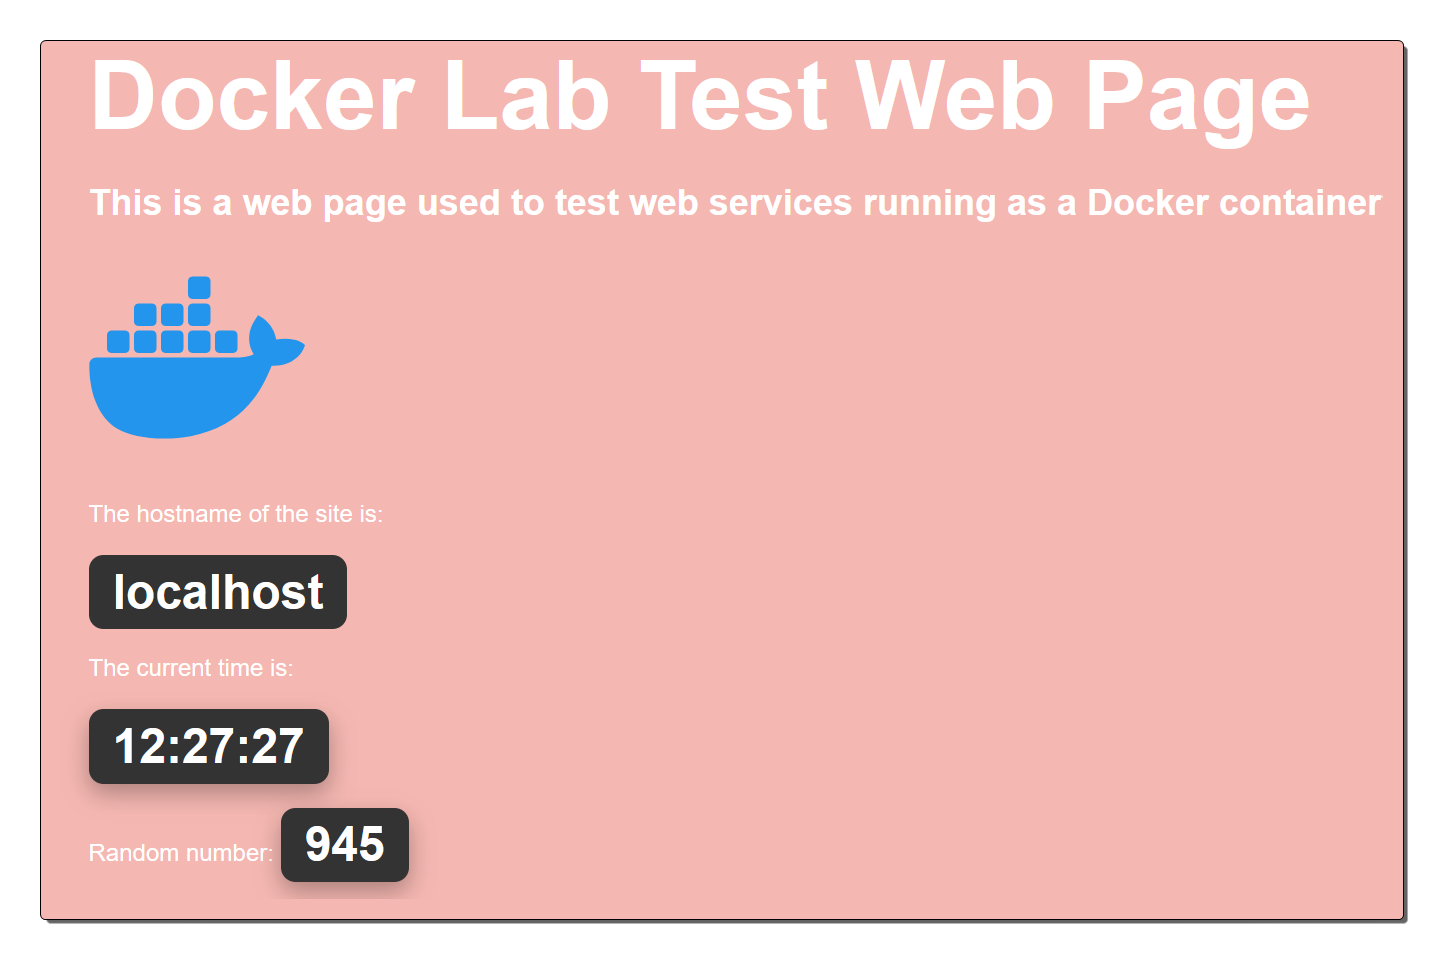
Now open a broswer and go to http://{dockerhost}:8080 where {dockerhost} is the IP of your workstation. This will open the website.
Update the image with a change
Remember, a Docker image is immutable. Meaning, once the image is created or running as a container you don’t change it. You create a new version of the image and then deploy it. This is one reason why using tags is so important.
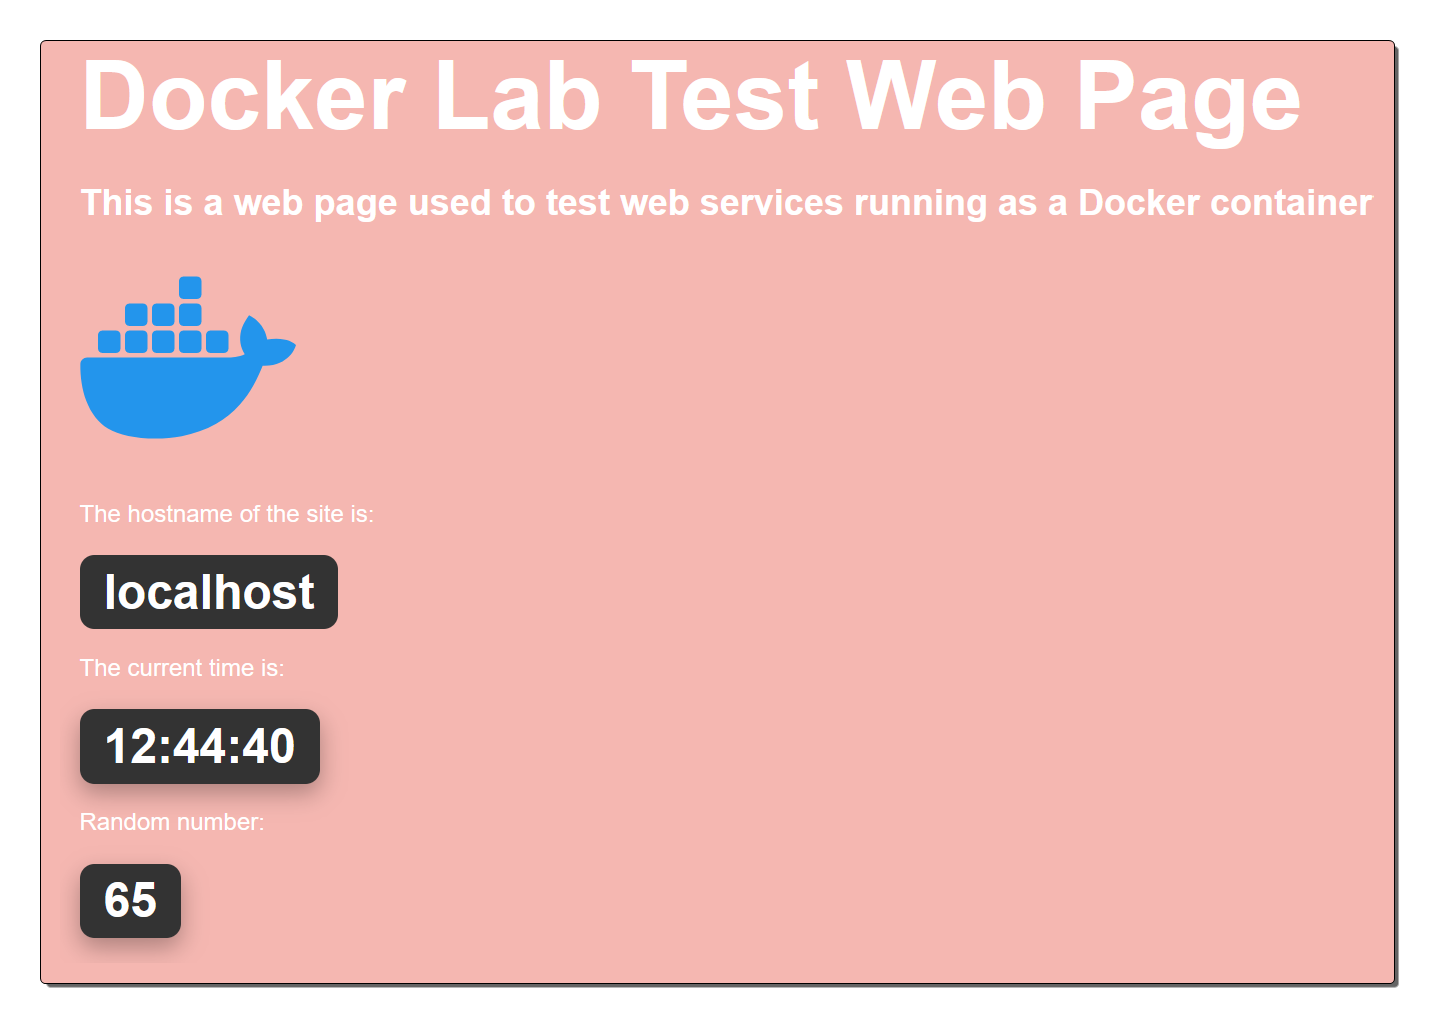
Perhaps we want to change the website code. The random number should be placed beneath the Random number title like the hostname and current time. First, you make the change to the code in the src folder in your working directory and test it locally. Once happy, you then need to go through a process to ensure you maintain transparency about which image is what version.
First, you test the new image in Docker. So create a new Docker image with the updated web site code tagged as staging. Notice the additon of --no-cache. Docker uses caching during the build process, and if there are no changes to a specific build step or layer, Docker will use the cached results. In the case of changing a value in a HTML file, which is typically part of the build context, Docker will not be aware of the specific change in the file unless you explicitly instruct it to rebuild that layer.
To ensure that Docker picks up the updated HTML file and rebuilds the relevant layer, you can use the
--no-cacheflag with the docker build command. This option disables caching and forces Docker to rebuild all the layers from scratch, including the one containing the updated HTML file.
docker build --no-cache -t lab-web:staging .
You now have two images in your local registry.
$ docker image ls
REPOSITORY   TAG       IMAGE ID       CREATED          SIZE
lab-web      staging   e362543d6ad3   2 minutes ago    142MB
lab-web      latest    7b34175cd9d1   57 minutes ago   142MB
Start the new image as a container and test it works okay. You can change the Docker host port so it does not clash with the latest container you may already be running. This example changes the port to
8081.
docker run -d -p 8081:80 lab-web:staging
Now open a broswer and go to http://{dockerhost}:8081 where {dockerhost} is the IP of your workstation. This will open the revised staging website.
Now we have two Docker images but the one tagged as latest is out of date and you want to update your environment to the new revised web code. The standard process for promoting a Docker image from a staging version to the latest version typically involves re-tagging the current latest image with a version number and then re-tagging the staging image as the new latest. Here’s a step-by-step process:
List your Docker images to identify the current latest and stage versions:
$ docker image ls
REPOSITORY   TAG       IMAGE ID       CREATED          SIZE
lab-web      staging   e362543d6ad3   2 minutes ago    142MB
lab-web      latest    7b34175cd9d1   57 minutes ago   142MB
Determine the
IMAGE IDof the currentlatestimage and tag it with aversion number:
$ docker tag {IMAGE ID} lab-web:{VER NUMBER}
Verify that the re-tagging was successful by listing your Docker images again:
docker image ls
REPOSITORY   TAG       IMAGE ID       CREATED             SIZE
lab-web      staging   e362543d6ad3   8 minutes ago       142MB
lab-web      0.1.0     7b34175cd9d1   About an hour ago   142MB
lab-web      latest    7b34175cd9d1   About an hour ago   142MB
Determine the
IMAGE IDof the currentstagingimage and tag it with aslatest:
$ docker tag {IMAGE ID} lab-web:latest
Verify that the re-tagging was successful by listing your Docker images again:
$ docker image ls
REPOSITORY   TAG       IMAGE ID       CREATED             SIZE
lab-web      latest    e362543d6ad3   10 minutes ago      142MB
lab-web      staging   e362543d6ad3   10 minutes ago      142MB
lab-web      0.1.0     7b34175cd9d1   About an hour ago   142MB
After completing these steps, you will have a duplicate of staging tagged as the latest, and the previous latest version will be re-tagged with a version number. The staging image will still exist and you would follow the same process to create a new staging image when required, then promote that new staging image to become the new latest, and so on.
Publish the Docker image to a registry (Docker Hub)
At this stage, we have some Docker images in a local Docker registry that are tested and working. But as it’s bad practice to version control built images in GitHub and our workstation is not durable, we need somewhere safe to keep our images plus, nobody else can use our excellent image from their Docker environment as they’d first need the Dockerfile, and then would have to build their version or better still they can pull our pre-built image from a Docker registry they do have access to.
In real life, you typically develop your Docker image locally, then publish the generated image to a registry for your enterprise teams to pull the image onto the enterprise Docker environment to run. You would then store your Dockerfile and application code in a VCS such as GitHub. There is of course, a lot more to it, but the point here is to publish a Docker image to a 3rd party registry and then run it as a container using the Docker pull command.
INFO
This pressumes you have a Docker Hub accountDocker Hub is the default choice but you can use private registries as well. The example below uses Docker Hub for simplicity.
First login to Docker Hub from the Terminal on your workstation by running the following command and completing the workflow. When completed your Docker environment will have access to Docker Hub as whomever you logged in as which grants you permissions to publish images there.
docker login
The image must have a tag that works in a public registry like Docker Hub. The image of
lab-web:latestwon’t work as it would try to put the image into a repository called lab-web. So you need to prefix your image with the target repository which matches your account profile. My account profile isgrinntec:
docker image tag lab-web:latest grinntec/lab-web:latest
Now check the images in your local repository and you have a new one named after the tag you just created.
docker image ls
REPOSITORY         TAG       IMAGE ID       CREATED             SIZE
grinntec/lab-web   latest    e362543d6ad3   32 minutes ago      142MB
lab-web            latest    e362543d6ad3   32 minutes ago      142MB
lab-web            staging   e362543d6ad3   32 minutes ago      142MB
lab-web            0.1.0     7b34175cd9d1   About an hour ago   142MB
Now push the newly tagged image to the Docker Hub repository
docker image push grinntec/lab-web:latest
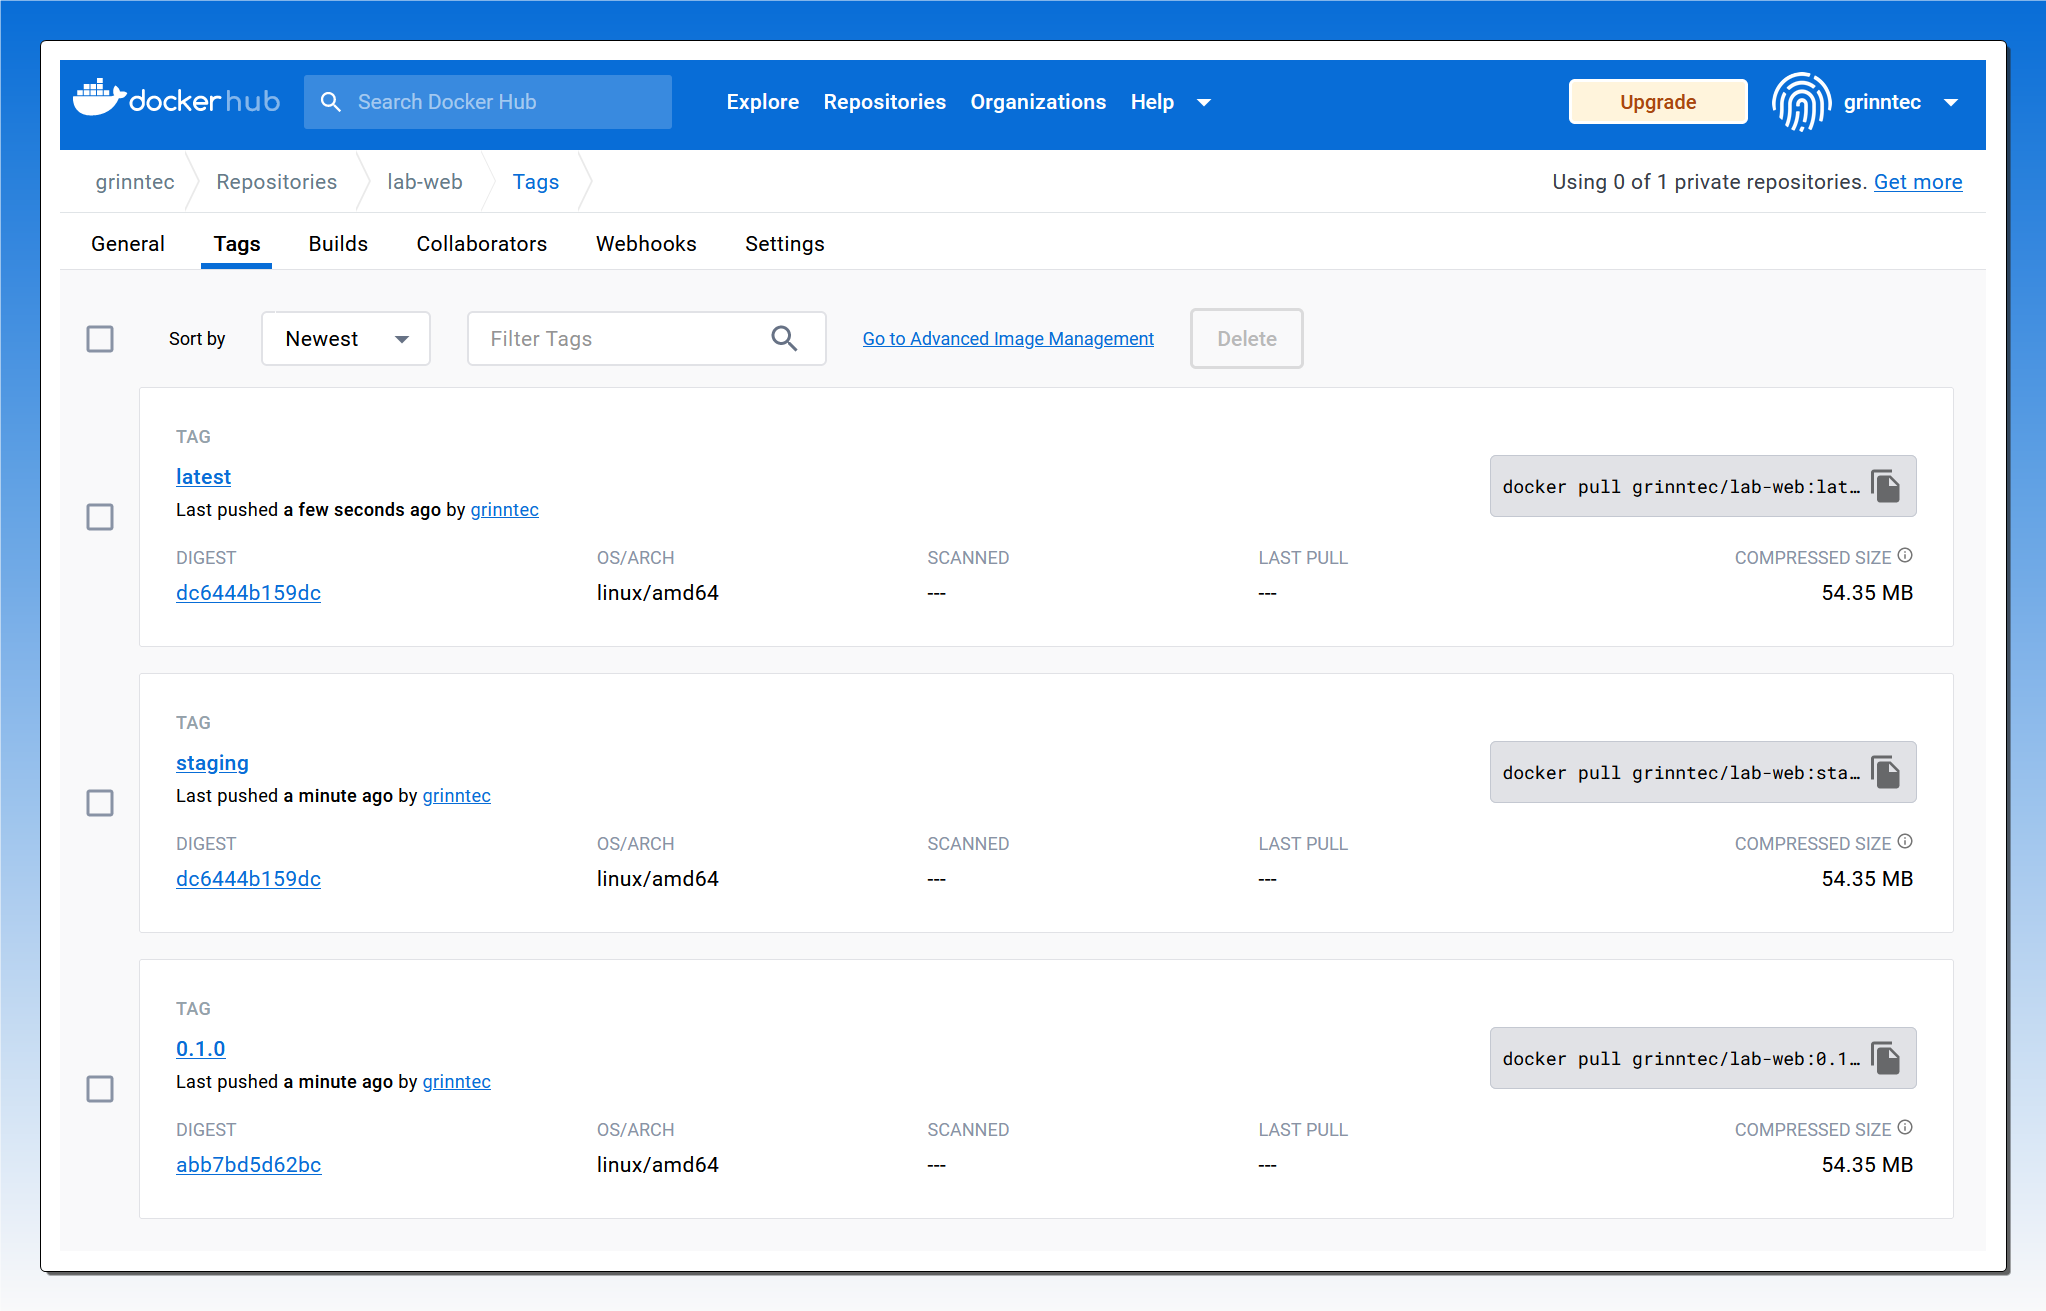
You can repeat these same steps for the images with staging and a version number so you end up with a current latest plus the staging and previous image you can roll back to as needed with a version number. This can easily be checked on the Docker Hub website as per below.
Pull the image and run it
Now your images are published to a registry that is accesible to others (Docker Hub). If someone wants to run the latest version of your excellent website they can simply run the command below from their Docker environment which will assume you mean Docker Hub as the source, then check the local registry for the same image and if not present download a copy, then exexcute it. All that from one command which can easily be put into an IaC or Ansible process to setup your application environment!
docker run -d -p 8080:80 grinntec/lab-web:latest