Azure Automation Account
6 minute read
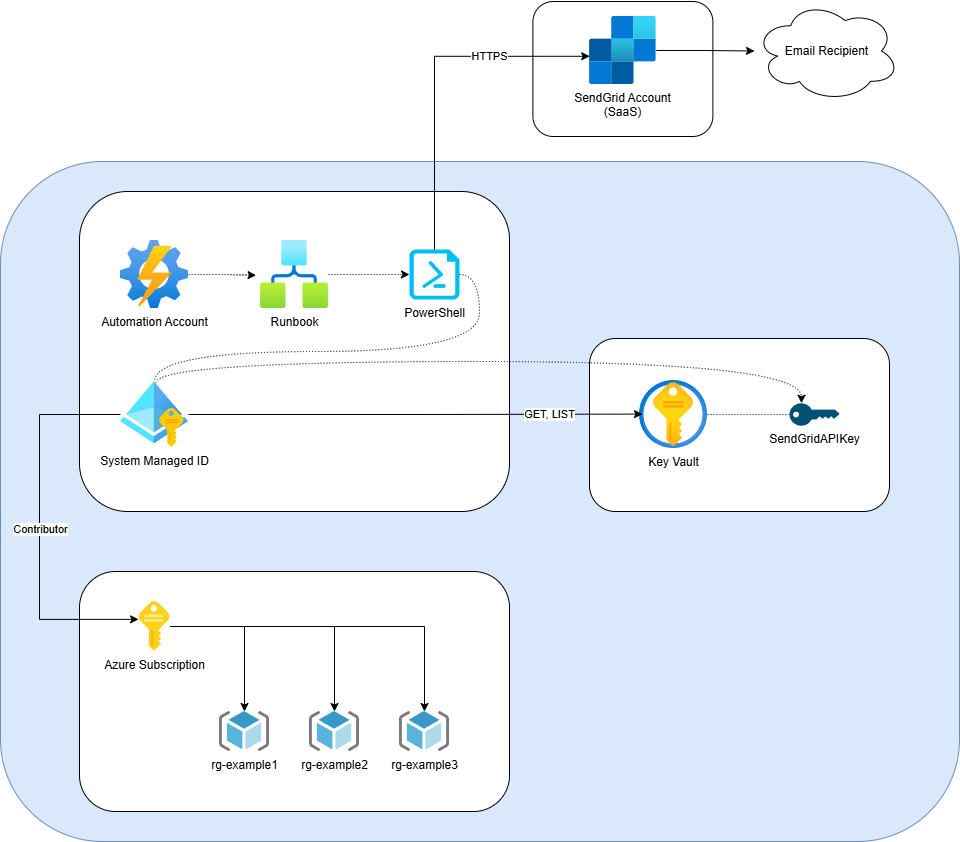
Goal
The automation account continuously monitors Azure resources and manages their lifecycle. It executes a runbook: CheckAndScheduleDeletions. This runbook identifies resources based on their creation date and schedules deletions if they meet specific criteria. When a deletion is scheduled, it retrieves the SendGrid API key from the Azure Key Vault and sends email notifications about the scheduled deletions using SendGrid. The process runs daily according to a predefined schedule.
Role of Tags
- Tags are used to identify resources based on their creation date (CreatedOnDate).
- This helps determine which resources are due for deletion based on their age.
- When a resource is identified for deletion, it is tagged with a ScheduledDeletion date.
- This tag indicates when the resource is supposed to be deleted, automating the scheduling process.
- Some resources may need to be preserved. The ExcludeFromDeletion tag is used to mark these resources, ensuring they are not deleted during the automation process.
- Tags help trigger notifications. When a resource is scheduled for deletion, the ScheduledDeletion tag prompts the SendEmailNotification runbook to send email notifications.
Requirements
- Twilio SendGrid Account
- Azure Automation Account
- Azure Key Vault
- Runbooks in PowerShell
Create SendGrid Account
SendGrid on Azure as SaaS allows you to send emails at scale using SendGrid’s email delivery service integrated with Microsoft Azure.
In the Azure Portal, click on the Create a resource button. In the Search the Marketplace box, type SendGrid and press Enter. Select Twilio SendGrid from the search results. Enter the Azure details required for the subscription.
Enter a name for your SendGrid account (e.g. AutomaticResourceDelete). Choose your target Azure subscription and resource group. Choose the free tier (or a paid one if you need more features).
When prompted, complete your account details on the SendGrid platform. You are required to verify sender information before SendGrid will process your requests.
Create Azure Automation Account
Navigate to the Azure Portal and search for Automation Accounts. Click Add to create a new Automation account. Enter a unique name for the Automation account. Select your Azure subscription. Choose the resource group you created or select an existing one. Choose the Azure region.
This setup uses the system assinged managed identity of this automation account but you can create a user assigned one if preferred. But as this automation account is the only resource needing RBAC permissions using system assigned is fine.
Create the Key Vault
Create a standard Azure Key vault to store the SendGrid API key as a secret. Make sure to use RBAC for permissions and assign yourself with Key Vault Admin role.
Generate a SendGrid API Key
Once your SendGrid account is created, navigate to the SendGrid resource in the Azure Portal. Go to the Manage section to be redirected to the SendGrid website. Log in to SendGrid with your credentials. In the SendGrid dashboard, go to Settings | API Keys. Click on Create API Key, give it a name (e.g. SendGridAdminAccount) and select Full Access. Save the API Key somewhere secure, as you’ll need it for the next steps.
Create the SendGrid API Secret
Add the SendGrid API key as a secret. Name it for example SendGridApiKey.
Grant Automation Account RBAC permissions
Allow the automation account to retrieve the SendGrid API key value when the run book executes and edit all resources within the subscription.
In the Automation account resource, go to Account Settings | Identity | Azure Role Assignments. Add the following roles:
Key Vault Secrets UserContributor
Create the Runbook
In your Automation Account, go to Process Automation | Runbooks. Click on the + Create a runbook button. Enter a name for your Runbook. Select the latest PowerShell.
CheckAndScheduleDeletions
Param(
    [Parameter(Mandatory=$true)]
    [string] $vaultName,

    [Parameter(Mandatory=$true)]
    [string] $secretName,

    [Parameter(Mandatory=$true)]
    [string] $fromEmail,

    [Parameter(Mandatory=$true)]
    [string] $toEmail
)

# Log messages
function Write-LogMessage {
    param (
        [string]$message,
        [string]$type = "INFO"
    )
    Write-Output "[$type] $message"
}

# Send email notifications
function Send-EmailNotification {
    param (
        [string]$subscriptionName,
        [string]$resourceName,
        [string]$resourceType,
        [string]$resourceGroupName,
        [datetime]$deletionTime,
        [string]$fromEmail,
        [string]$toEmail,
        [string]$sendGridApiKey
    )

    Write-LogMessage -message "Preparing to send email notification..."
    $emailBody = @"
<!DOCTYPE html>
<html>
<head>
    <style>
        body { font-family: Arial, sans-serif; }
        .container { padding: 20px; }
        .header { font-size: 18px; font-weight: bold; }
        .content { margin-top: 20px; }
        .content p { margin: 5px 0; }
        .content .label { font-weight: bold; }
    </style>
</head>
<body>
    <div class="container">
        <div class="header">Resource Deletion Notification</div>
        <div class="content">
            <p>Hello,</p>
            <p>The following resource is scheduled for deletion:</p>
            <p class="label">Subscription Name:</p> <p>$subscriptionName</p>
            <p class="label">Resource Name:</p> <p>$resourceName</p>
            <p class="label">Resource Type:</p> <p>$resourceType</p>
            <p class="label">Resource Group:</p> <p>$resourceGroupName</p>
            <p class="label">Scheduled Deletion:</p> <p>$deletionTime</p>
            <p>To prevent deletion, please remove or update the 'ScheduledDeletion' tag on the resource.</p>
            <p>Thank you.</p>
        </div>
    </div>
</body>
</html>
"@

    $emailContent = @{
        personalizations = @(@{ to = @(@{ email = $toEmail }) })
        from = @{ email = $fromEmail }
        subject = "Resource Deletion Notification: $resourceName"
        content = @(@{ type = "text/html"; value = $emailBody })
    } | ConvertTo-Json -Depth 5

    Write-LogMessage -message "JSON payload:"
    Write-LogMessage -message $emailContent

    try {
        Write-LogMessage -message "Sending email using SendGrid API..."
        Write-LogMessage -message "SendGrid API Key length: $($sendGridApiKey.Length)"
        Invoke-RestMethod -Uri "https://api.sendgrid.com/v3/mail/send" -Method Post -Headers @{
            Authorization = "Bearer $sendGridApiKey"
            "Content-Type" = "application/json"
        } -Body $emailContent
        Write-LogMessage -message "Email notification sent for resource $resourceName."
    } catch {
        Write-LogMessage -message "Failed to send email notification: $_" -type "ERROR"
        throw $_
    }
}

# Authenticate to Azure
# Ensure AzContext is not inherited
Disable-AzContextAutosave -Scope Process

# Authenticate using Managed Identity
$AzureContext = (Connect-AzAccount -Identity).Context
Set-AzContext -SubscriptionId $AzureContext.Subscription.Id | Out-Null

# Retrieve SendGrid API Key from Azure Key Vault
$VaultName = $vaultName
$sendGridApiKeySecure = Get-AzKeyVaultSecret -VaultName $VaultName -Name $secretName

# Convert SecureString to plain text
$sendGridApiKey = [System.Runtime.InteropServices.Marshal]::PtrToStringAuto([System.Runtime.InteropServices.Marshal]::SecureStringToBSTR($sendGridApiKeySecure.SecretValue))

# Main script execution
try {
    $currentDate = Get-Date
    Write-LogMessage -message "Current date and time: $currentDate"

    Write-LogMessage -message "Retrieving all resource groups in the subscription..."
    $resourceGroups = Get-AzResourceGroup
    Write-LogMessage -message "Found $($resourceGroups.Count) resource groups."

    foreach ($resourceGroup in $resourceGroups) {
        $resourceGroupName = $resourceGroup.ResourceGroupName
        Write-LogMessage -message "Processing resource group: $resourceGroupName"

        Write-LogMessage -message "Retrieving resources in resource group: $resourceGroupName"
        $resources = Get-AzResource -ResourceGroupName $resourceGroupName
        Write-LogMessage -message "Found $($resources.Count) resources in resource group: $resourceGroupName"
        $allResourcesDeleted = $true

        foreach ($resource in $resources) {
            if ($resource.Tags -and $resource.Tags.ContainsKey("CreatedOnDate") -and -not $resource.Tags.ContainsKey("ExcludeFromDeletion")) {
                $createdOnDate = $resource.Tags["CreatedOnDate"]
                $deletionTime = if ($resource.Tags.ContainsKey("ScheduledDeletion")) { $resource.Tags["ScheduledDeletion"] } else { $null }

                if ($createdOnDate) {
                    $resourceCreatedDate = [datetime]::Parse($createdOnDate)
                    $ageInMinutes = ($currentDate - $resourceCreatedDate).TotalMinutes
                    Write-LogMessage -message "Resource $($resource.Name) created on $resourceCreatedDate (age: $ageInMinutes minutes)"

                    if ($deletionTime) {
                        $scheduledDeletion = [datetime]::Parse($deletionTime)
                        if ($currentDate -ge $scheduledDeletion) {
                            Remove-AzResource -ResourceId $resource.ResourceId -Force
                            Write-LogMessage -message "Deleted resource: $($resource.Name)"
                        } else {
                            Write-LogMessage -message "Resource $($resource.Name) scheduled for deletion at $scheduledDeletion"
                            $allResourcesDeleted = $false
                        }
                    } elseif ($ageInMinutes -gt 720) { # 12 hours = 720 minutes
                        $scheduledDeletion = $currentDate.AddHours(12)
                        $resource | Set-AzResource -Tag @{ "ScheduledDeletion" = $scheduledDeletion.ToString("o") } -Force
                        Write-LogMessage -message "Scheduled deletion for resource: $($resource.Name) at $scheduledDeletion."

                        Send-EmailNotification -subscriptionName $AzureContext.Subscription.Name -resourceName $resource.Name -resourceType $resource.ResourceType -resourceGroupName $resourceGroupName -deletionTime $scheduledDeletion -fromEmail $fromEmail -toEmail $toEmail -sendGridApiKey $sendGridApiKey

                        $allResourcesDeleted = $false
                    } else {
                        $allResourcesDeleted = $false
                    }
                } else {
                    $allResourcesDeleted = $false
                }
            } else {
                $allResourcesDeleted = $false
            }
        }

        if ($allResourcesDeleted) {
            Remove-AzResourceGroup -Name $resourceGroupName -Force
            Write-LogMessage -message "Deleted resource group: $resourceGroupName"
        } else {
            Write-LogMessage -message "Resource group $resourceGroupName contains undeleted resources."
        }
    }

    Write-LogMessage -message "Runbook execution completed."
} catch {
    Write-LogMessage -message "Runbook execution failed: $_" -type "ERROR"
    throw $_
}
Create a schedule and set parameters
In the automation account, go to Shared Resources | Schedules and create a schedule that runs once a day called Daily.
Go to the CheckAndScheduleDeletions runbook and associate it with the schedule and set any parameter values for the script.
References
azure/automation-account/AutomaticResourceDelete
Send an email from an Automation runbook
Twilio: Sending Email with Microsoft Azure
Twilio: Mail Send API Overview
Feedback
Was this page helpful?
Glad to hear it!
Sorry to hear that.