Azure - Host the website
One way of hosting web content in Azure is to create a storage account and enable the static website feature. This creates a $web container from which web content can be served on an Azure hosted endpoint address.
Terraform
The following Terraform IaC will:
- Resource group
- Name:
${var.app_name}-${var.environment}-rg - Location:
var.location
- Name:
- Storage Account
- Name:
${lower(random_string.this.result)}${lower(var.environment)} - Account kind:
StorageV2 - Account tier:
Standard - Account replication type:
LRS - Access tier:
Cool - Create static website:
True - Content directory:
../website
- Name:
- Upload the web content directory to the
$webcontainer- The
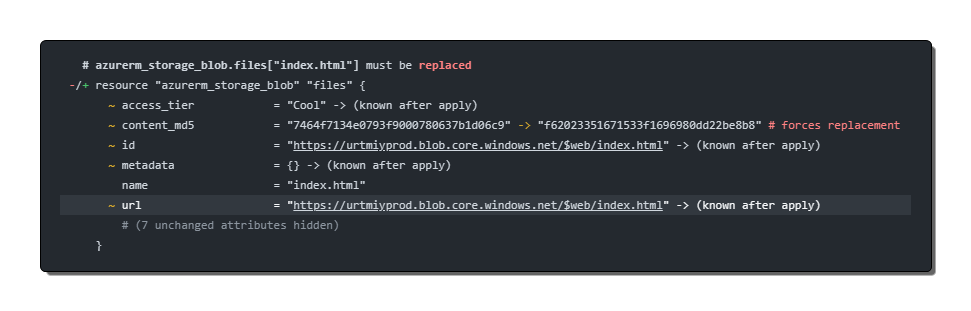
../websitepath is a reference to a folder in the same GitHub repository as the Terraform code. We use the..to go up a level from where the Terraform code is running from as on the GitHub runner we have checked out the entire repository - To ensure Terraform recognizes changes to the content of the website folder we checksum each file into the Terraform state file which means when a file is changed the checksum process returns a different result during the Terraform init stage and Terraform knows to push that changed file to the storage account. Without this step no changed files would ever be pushed by Terraform as it does not read the content.
- To ensure the HTML and CSS files mime data are set correctly in the Storage account the
content_typeis set based on the file extension. Without this CSS files would be handled as TXT whuch means they would not be loaded by the storage account and style the website.
- The
CLI
Logon to Azure and create the storage account
{{< tabpane persist=false >}} {{< tab header="Azure PowerShell" lang="powershell" >}} Connect-AzAccount {{< /tab >}} {{< tab header="az cli" lang="powershell" >}} az login {{< /tab >}} {{< /tabpane >}}
Check which subscription is assigned to your CLI context. This is important as your context defines which subscription you are working in.
{{< tabpane persist=false >}} {{< tab header="Azure PowerShell" lang="powershell" >}} (Get-AzContext).Subscription.Name {{< /tab >}} {{< tab header="az cli" lang="powershell" >}} az account show {{< /tab >}} {{< /tabpane >}}
If incorrect, then change subscription.
{{< tabpane persist=false >}}
{{< tab header="Azure PowerShell" lang="powershell" >}}
Select-AzSubscription -SubscriptionName
Create a resource group to host your resource instances
{{< tabpane persist=false >}}
{{< tab header="Azure PowerShell" lang="powershell" >}}
New-AzResourceGroup -Name
Create a new storage account
{{< tabpane persist=false >}}
{{< tab header="Azure PowerShell" lang="powershell" >}}
New-AzStorageAccount -Name
Enable the static website service in the new storage account
Get the storage account key.
Not required for az cli
{{< tabpane persist=false >}}
{{< tab header="Azure PowerShell" lang="powershell" >}}
$storageKey = (Get-AzStorageAccountKey -ResourceGroupName
Set the storage context
Not required for az cli
{{< tabpane persist=false >}}
{{< tab header="Azure PowerShell" lang="powershell" >}}
$ctx = New-AzStorageContext -StorageAccountName
Enable static content
Not required for az cli
{{< tabpane persist=false >}} {{< tab header="Azure PowerShell" lang="powershell" >}} Enable-AzStorageStaticWebsite -Context $ctx -IndexDocument index.html {{< /tab >}} {{< /tabpane >}}
Upload your website files
You can choose to do the upload of the index and error files using the portal but below are the CLI commands that will do the same.
Be aware of the tick in-front of the
$webin the PowerShell value otherwise the command will fail with an error about the container being null.
{{< tabpane persist=false >}}
{{< tab header="Azure PowerShell" lang="powershell" >}}
Get-ChildItem -Path $web -Context $ctx -Properties @{"ContentType" = "text/html"} -Force
}
if ($_.Extension -eq ".css") {
Set-AzStorageBlobContent -File $_.FullName -Blob $blobName -Container$web -Context $ctx -Properties @{"ContentType" = "text/css"} -Force
}
if ($.Extension -eq ".js") {
Set-AzStorageBlobContent -File $_.FullName -Blob $blobName -Container `$web -Context $ctx -Properties @{"ContentType" = "application/javascript"} -Force
}
}
{{< /tab >}}
{{< tab header="az cli" lang="powershell" >}}
az storage blob upload-batch --account-name {SA NAME}
--source "
Access your website
Now you have a basic website running on the storage account which will use the files you just uploaded. You can use the Azure provided URL to check how your website looks.
{{< tabpane persist=false >}} {{< tab header="Azure PowerShell" lang="powershell" >}} $storageAccount = Get-AzStorageAccount -ResourceGroupName {RESOURCE GROUP} -Name {SA NAME}
Write-Output $storageAccount.PrimaryEndpoints.Web {{< /tab >}} {{< tab header="az cli" lang="powershell" >}} az storage account show --name {SA NAME} --resource-group {RESOURCE GROUP} --query "primaryEndpoints.web" --output tsv {{< /tab >}} {{< /tabpane >}}
PowerShell Script
I've created an Azure PowerShell script that creates all the resources necessary to host a ststic website on an Azure storage account and upload some basic web site code.
You can follow the steps below, the end result will be the same.
Azure Static Website Deployment PowerShell Script
{{% alert title="Status" %}} At this stage, you have an Azure Storage account with static website enabled and a blob container hosting the website files. You access the website using the default Azure URL over an HTTP or HTTPS connection depending on if you enforce HTTPS on Azure Storage Accounts or not; see below.
Note that if you enforce Secure Transfer this will enforce HTTPS in the connection URL. But you cannot map a custom domain with HTTPS to an Azure Storage Account, so the HTTPS section of this project sets up Azure CDN which does support custom domain name mapping.
https://{NAME}.web.core.windows.net/
{{% /alert %}}
References
Install the Azure Az PowerShell module